Bifold door installation, despite looking complicated on the surface, is relatively simple and doesn’t require a professional door installation engineer to complete. All you need is the correct equipment, a complete installation kit, and an afternoon out of your day.
In today’s article we, at Glass Door Centre, will be answering the question: What is the bifold door installation process? To help you with installing bifold doors with confidence.
The Preliminary Steps
- Planning permission
Bifold door installation does not require planning permission as it is categorised as a ‘Class A Permitted Development’ that acts as an improvement on your home. So, you don’t need to worry about any potential issues with installing bifold doors concerning legality. But you do need to consider the preparation of the aperture itself before attempting bifold door installation.
- Measure your existing doors
If you’re installing bifold doors to replace existing doors, you’ll need to take measurements of the top, middle, and bottom of your current doors. It is important to check that these measurements are accurate, or else you could be sent a door that is too big or too small. It is also advised to measure the height of your door as well.
- Survey the aperture and surrounding areas
It is important to ensure that your aperture is solid, flat, and level from every angle, and creates a perfect square when measured diagonally. Wonky doors aren’t only frustrating, they’re not as secure as doors surrounded by perfect apertures. Additionally, you should be sure that there will be nothing in the surrounding areas of the aperture that could prohibit your doors from opening as they should. Whether that be objects in the way or the height of your internal floor. Bifold doors can be restricted and damaging to your flooring if your floor is too high.
What to do next

- Get a quote
Here at Glass Door Centre, we have a comprehensive quoting system that allows you to input all of the information we need to manufacture your bespoke door. You should conduct all of your measurements first to receive the most accurate quote possible so that you can plan your budget.
- Remove any old silicone
Silicone is amazing. It keeps external elements out and protects your doors and your home from damage from the elements while remaining durable for 10-20 years. The endurance of this fabulous substance may lead you to believe that removing it from your aperture will be a difficult task, but that couldn’t be further from the truth.
- How to remove old silicone
All you need to do is to apply sealant remover to the old silicone, leave it to soak and loosen for a few hours, and gently use a sharp-edged blade to scrape the old silicone away.
It is not possible to install your bifold door without this process, as silicone adheres only to dry and clean areas with no dirty residue. Additionally, it is important to be careful while removing the silicone, as being too rough can damage the area in which your new silicone will be placed.
–
The Equipment You’ll Need
To complete any task, you need the correct equipment. Bifold door installation kits will provide the majority of, if not all of the components needed for installing bifold doors, but the equipment will need to be supplied by yourself. The items you’ll need for successful installation consists of:
- A Tape Measure
- A Soft Mallet
- A Spirit Level
- A 4mm Hex Key
- A Pozi No 2 Bit
- A Glazing Paddle
- Glazing Suction Lifters
- A Cordless Drill/ Driver
- 3 & 5mm Drill Bits
- Low Modulus Silicone Sealant
- Outer Frame Packers
- Frame fixing screws
After ensuring that each of the components required to put your door together is included, you can begin the building process.
The Process
- Check the stickers
Each component will have a sticker that will correlate to the parts specified in our highly-detailed bifold door installation guide.
The stickers mark each of the components separately because they are not interchangeable, and putting the wrong pieces together will result in you needing to completely deconstruct the door and start again, which can be difficult once you’ve sealed particular components together with silicone.
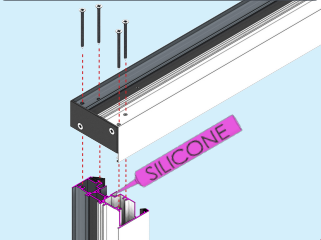
- The outer frames
The outer frames will be the first step to installing bifold doors. Each of these frames is connected together with screws and silicone to ensure that they’re secure before you move to the next component. It should be noted that the screws must be tightly fitted, but over-tightening them can lead to distortion, so be mindful. Despite the fact that some screws in certain components are specified to be flush or sub-flush, this concept applies to every step.
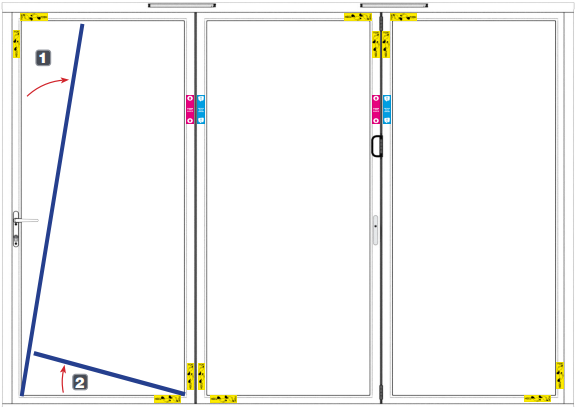
- Installing the sash
The first sash will easily connect to the door frames, but it is important to only insert two of the three screws, rather than securing the entire hinge into place at once. This will make it easier to adjust the hinge height if you need to. You can then connect sash one and two together, still ensuring to only insert two of the three screws.
- Door handle installation
A surprisingly common mistake that occurs when installing door handles is incorrect positioning of the handles themselves. They need to look as though you’ve held the handle to a mirror to ensure that your handles don’t look like opposites. The door handle and its internal components will easily screw and slide into place once everything is positioned as it should be.
Extras
- Trickle vents
Trickle vents aren’t necessary but are recommended to help ventilate the doors and prevent condensation from gathering and causing damage.
- Cill installation
The cill is installed simply using outer frame packers, frame-fixing screws, and low-modulus silicone sealant. The cill must be level and secure before you can progress to the remainder of your bifold door installation.
The Doors
- Door installation
You must ensure that your doors are both vertically and horizontally level with a spirit level before properly installing bifold doors using fixing screws and silicone. Take your time so that you don’t have wonky doors.
- Using beads
Door beads provide an additional layer of protection to your glazing, and prevent them from slipping, which is why it is important to ensure that they are securely in place before installing your glazing.
- Testing
When you’re happy with the slide and ease of your bifold doors you can finally screw the hinges into place, remove the door beads and gaze at your marvellous new doors.
–
How can Glass Door Centre help?
Here at Glass Door Centre, we have everything you need for installing bifold doors, including installation kits and a comprehensive quoting system so we can meet your exact requirements and provide you with the door you desire. Contact us today to speak to one of our highly trained representatives about our products and services.